
[2023] Patagonia Packing List – Detailed Guide With Essentials and Tips
Patagonia is one of those trips that many travelers have on their bucket list. It has the allure of the mountains, pristine turquoise lakes, stunning glaciers, and a pure sense of adventure. The incredible range of sights and activities in Patagonia also translates to dynamic climates and ever-changing weather which makes figuring out what to bring a huge challenge.
Having spent 2 weeks in Torres del Paine, our goal for this Patagonia packing list is to give you a clear picture of what you should pack in your backpack and suitcase that’ll ensure you haven’t missed a thing.
Read more about South America
Where to stay in Torres del Paine?
- I personally stayed at and would highly recommend staying at the Hotel Las Torres which is within the national park and conveniently located right at the trailhead for the Base of the Towers hike. They offer an all-inclusive package which is a great way to see Torres del Paine without any stress.
- If you’re looking for more adventure, Chile Nativo has fantastic packages that can cater to your every need. I really loved doing their Multisport Tour. Their W Trek Plus looks amazing as well. Keep reading to find out how you can get a discount with them.
Here’s what we’re covering:
Before You Start Packing for Patagonia

Packing lists are a tricky thing because there are so many “what-ifs” and biases that come with what we bring with us on trips so before we jump in, I wanted to provide context for how this guide came to be and questions you’ll want to ask yourself.
Read this first
We poured in every single ounce of information into our Torres del Paine and Patagonia travel guide which is going to make your trip planning so much easier.
Patagonia is larger than you think
The area that we call “Patagonia” is one that’s a bit misunderstood for those that haven’t been before because it immediately conjures up images of Torres del Paine National Park, Monte Fitz Roy, and Perito Merino Glacier.
Officially, the Patagonia is a geographical region that has somewhat debated borders that spans two countries – Chile and Argentina. It’s mostly accepted that it starts in the north approximately by the Colorado River for Argentina, and south of Temuco in Chile, and it goes all the way down to the end of the continent where most will include the archipelago of of Tierra del Fuego.
The region is ridiculously massive.
Background of this packing guide

Context is everything and while I would love to be able to say that I’ve done every trek and activity over all seasons and regions of Patagonia, that’s simply not the case.
I was lucky enough to spend 2 weeks in Patagonia, mostly focused on Torres del Paine National Park which is in Chile. This was in September which is a transition season from winter to spring.
During this time, I travelled with Chile Nativo on one of their multisport packages in Torres del Paine and also an all-inclusive stay at Hotel Las Torres.
It’s true that this means that I have a very narrow view of Patagonia because I did not get to go to El Chaltén or El Calafate in Argentina, I didn’t explore the northern or southern reaches of the region (i.e. the new Route of Parks, Tierra del Fuego), and I only saw it in the spring season.
Still, having been there in person and having faced challenging weather conditions, I know the importance of being prepared and in some cases being over-prepared.
Lastly, you’ll notice that I have a LOT of Arc’teryx gear. This obsession started from our trip to the Magdalen Islands where we needed serious layers for -5°C (23°F) weather. Much of what you see in this Patagonia packing list comes from that trip where I made a decision to invest in high quality equipment.
Goal of this packing list
Similar to our other packing lists, the goal of this packing list is to provide an authentic look at one traveler’s take on how to pack for Patagonia as I’ve always found that the generic lists are too broad and lack the detail of someone that’s actually been.
It’s also worth noting that this packing list was created after the trip was completed so I’ve removed many things that I didn’t feel like were particularly useful.
Know your trip
Rightfully so, this packing list should be about you. What you pack will be dictated by the gear that you already have at home, budget for new gear, the type of travelling you’ll be doing, where in Patagonia you’re going, how long you’ll be away for, the season, and whether you’re combining this trip with other places.
We’ve pulled out a few key questions that will affect how you put together your own Patagonia packing list.
What season are you going?
This is an obvious one but you’ll definitely be packing very different than how I packed for this trip if you’re going in the middle of the summer.
During the high season which coincides with the warmer months (December – March), you won’t need the thicker layers and you won’t encounter ice and snow, but don’t be fooled, the weather is even less predictable this time of the year so layers are incredibly important and it doesn’t get as hot as you think it gets.
If we look at Torres del Paine National Park specifically, here is what the climate looks like.
| Month | High Temp | Low Temp | Rainy Days |
|---|---|---|---|
| Jan | 20°C / 68°F | 8°C /46.4°F | 5 |
| Feb | 19°C / 66.2°F | 6°C / 42.8°F | 5 |
| Mar | 17°C / 62.6°F | 5°C / 41°F | 6 |
| Apr | 12°C / 53.6°F | 3°C / 37.4°F | 7 |
| May | 9°C / 48.2°F | 0°C / 32°F | 9 |
| Jun | 5°C / 41°F | -3°C / 26.6°F | 6 |
| Jul | 4°C / 39.2°F | -3°C / 26.6°F | 5 |
| Aug | 8°C / 46.4°F | -1°C / 30.2°F | 4 |
| Sep | 10°C/ 50°F | 0°C / 32°F | 4 |
| Oct | 14°C / 57.2°F | 3°C / 37.4°F | 5 |
| Nov | 17°C / 62.6°F | 5°C/ 41°F | 4 |
| Dec | 18°C / 64.4°F | 7°C / 44.6°F | 7 |
What type of activities will you be doing?
Are you horseback riding? Will you be doing a full trek or exploring Patagonia more comfortably?
The individual activities you’ll be doing will really dictate the type of equipment you’ll want to bring with you.
Our advice is to think about each one critically and how it’ll impact what you want to carry with you and what you’ll be allowed to carry.
For instance, if you’re horseback riding, backpacks typically aren’t allowed so will you have the right small bag you can use or pouch you can have one of the guides to bring for you?
If you’re kayaking, will you want to bring your camera with you and if so, what bag will you use to carry it in. Will you be comfortable to have it outside wrapped by the bungee cords or underneath the skirt?
Not sure the answers to these questions? Ask the tour operator you’re booked with and find out.
What style of travel will you be doing?
A trip to Patagonia looks very different if you’re trekking, doing a Multisport experience with Chile Nativo where you’re camping and doing different activities everyday, or if you’re stay at an all-inclusive hotel like Las Torres.
I know I’m playing Captain Obvious here but like the previous question, run through how every day will look like and beyond the activities, how transportation will work, meals, off days, and the “in between” times.
How to use the packing list
While we could make generalized comments about the type of things you should pack, we thought it’d be much more valuable to do that but also add in specific recommendations for brands and gear that we actually own and use.
Sure, this packing list is certainly biased towards what you’ll need to explore Torres del Paine in the shoulder season but I’ll argue that it should be applicable to almost all parts of Patagonia.
The part that is missing in this packing list are the overnight camping gear but the beauty of the campsites along the O and W is that the equipment and meals are already there for you.
Lastly, being a guy, photographer, videographer, I also have a biased look at equipment and I apologize in advance that I don’t have a women’s version of the packing list.
Use this guide as you see fit and that could be picking up a couple of interesting pointers that you might never have thought or use it as a template. I leave it in your hands!
Special Discount with Chile Nativo
Chile Nativo was the main operator I used for my trip to Torres del Paine and they are the leaders in helping organize independent W and O treks but also do incredible guided experiences in the park.
We got you! We’ve negotiated a special 5% promotion with Chile Nativo. This applies to existing packages that they offer but not add-ons & upgrades or fully customized tours.
How? Type in “Going Awesome Places” under “Referral discount”. Simple as that!
Patagonia Packing List

Now let’s jump into what we recommend you pack for a trip to Patagonia. Ultimately, the key to building a Patagonia packing list is to be prepared for all of the elements with quality gear, while also keeping things as minimal as possible.
Jacket and Outer Layers

Jackets are the core piece of clothing that you want to get right and it needs to be versatile enough to be able to handle everything that Patagonia throws at you – rain, hail, snow, wind, sun, and chill.
In talking to the locals, it almost doesn’t matter what time of year you go, the weather is always unpredictable. Intuitively, you’d think that summer is the warmest and temperature wise it is but it’s also one of the windiest times of the year.
Following a proper layering guide, these outer layers serve the purpose of 1 shell and 2 mid-layers.
Using the right combination of these 3 exterior layers, you’ll be able to use them in so many different combinations, whether fully stacked, in pairs, or on their own. Especially during hiking, you might start off with all 3 layers at the bottom, get down to the fleece during the serious inclines, and then back to all the layers when you summit.
Is GoreTex necessary? All Arc’teryx shells use GoreTex and the Beta LT Hadron uses a unique fabric that provides waterproofing while staying light. An affordable alternative is the Patagonia Torrentshell 3L Jacket.
What we recommend:
- 1 waterproof shell – Your protection against the rain and wind.
- 1 synthetic down layer – Synthetic down is lighter, retains insulation when wet, and breathes better.
- 1 fleece – A quality technical fleece will trap warmth as good as a casual hoody but will be more lightweight, breathable, and give you flexible range of movement.
Gear we suggest:
- Arc’teryx Beta LT Hadron – This is the ultra lightweight and packable waterproof shell that you’ll slip on if it’s raining or as an additional layer for warmth.
- Arc’teryx Proton LT Hoody – This is a ridiculously comfortable, breathable, and warm layer that is extremely versatile.
- Arc’teryx Delta MX Hoody – Replaced by the Delta Hybrid Hoody, this is a fleece designed for high-output activities and is a perfect mid-layer when it’s not that cold but could be combined with the Proton LT when you need more insulation. A great alternative is the Patagonia R1 Air Hoody.
Looking for deals on travel gear?
Don’t miss our travel deals page for the latest discounts and promotions by our favorite travel companies.
Tops

The truth is, I felt like I didn’t even need this many shirts for my trip to Patagonia because of how cold it ended up being. Ultimately, the Icebreaker Merino 200 Oasis Long Sleeve Crew was a layer that got a lot of mileage because it was warm, thin, and didn’t smell after many uses.
In fact, this study by the University of Alberta has shown that merino wool can control odour better than polyester. This is why I’ve started to invest more in merino wool base layers.
Whether you’re doing the W Trek or exploring Torres del Paine with day trips as part of a Patagonia itinerary, nobody will care that you’re wearing the same layers everyday and with a fleece or jacket on each day, nobody will notice anyways.
What we recommend:
- 1-2 Merino wool base layer (175-200 weight)
- 2-3 quick-dry, lightweight t-shirts – In the summer replace one of these layers with a sun hoody.
- 1 thicker base layer
- 1 cotton t-shirt
Gear we suggest:
- Arc’teryx Cormac Short Sleeve – This is one of my go-to quick-dry shirts that’s great in all scenarios.
- Arc’teryx Motus AR Crew Long Sleeve – A heavier base layer that I used on extra cold days and as an extra layer at night when it got cold in the tent at the Chile Nativo Riverside Camp.
- Icebreaker Merino 200 Oasis Long Sleeve – The beauty of merino is that it’s moisture wicking and doesn’t get smelly even after multiple uses which is why I kept going back to this layer since my other layers were all short sleeves or a tad too thick.
- Team Canada t-shirt – Standard cotton t-shirt that I only used on the plane ride over and as a casual shirt at camp.
- Arc’teryx performance tee – An old lightweight and quick-dry shirt similar to the Cormac.
- Outdoor Research Echo t-shirt – Ridiculously light, breathable, and odor-blocking t-shirt that I’m really loving for adventure pursuits.
Bottoms

While I brought an assortment of pants and bottom base layers for Patagonia, there were a few layers that got an insane amount of usage and others that were handy to have in specific situations.
I know these aren’t exactly a lot of different combinations of pants to work with but you’re just going to have to get used to wearing the same pants everyday.
Are gaiters necessary? In Patagonia summer, we’d say no. However, if you’re there in the spring, winter, and fall when either rainfall is heavier or there’s snow in the ground, a lightweight and packable pair will keep you dry and clean.
No shorts? This probably depends on how comfortable you are in shorts in cooler weather but for most people, I feel like you’ll end up preferring pants over shorts. I packed them but they never saw any light of day. For the summer, I’d consider a convertible pant like the Outdoor Research Ferrosi Convertible Pants.
What about swimwear? If there are opportunities to go to hot springs on your trip, bring a pair but the truth is, there aren’t really any of significance if you’re looking at Torres del Paine and Los Glaciares national parks. If you’re staying at a hotel such as Rio Serrano Hotel and Spa that has a pool, that would be another reason to bring swimwear. Lastly, when kayaking in Patagonia, outfitters normally provide full dry suits so you’ll be wearing your normal hike wear.
What we recommend:
- 1-2 base layers/long johns – Depending on the time of year you’re going, consider packing this to layer on with your pants or cold nights.
- 2 hiking pants – Consider two style of pants here for different weather conditions. For summer, you could wear shorts but to be honest, there were many times we had to bushwhack through narrow passages through prickly trees and bushes.
- 1 waterproof shell pants – Wearing waterproof pants on nice days isn’t fun so a pair of waterproof shell pants can come in handy if you’re forced to hike through serious downfall.
- 1 pair of hiking gaiters – If there’s snow, water, or mud on the trails, this is handy to keep your pants clean and prevents water from getting into your shoe.
Gear we suggest:
- Icebreaker BodyfitZone Merino 260 3/4 Thermal Leggings – These don’t have to be 3/4 length but this is a heavyweight base layer designed for high output activities.
- Arc’teryx Rho Heavyweight Base Layer – Essentially really heavyweight long johns that I tried using during hiking but was a little too hot but ended up being the most useful in the tent on extremely cold nights.
- Arc’teryx Konseal Pant – Designed for climbing, these can be used when hiking during warm weather or just as a casual pant at camp or when in transit.
- Arc’teryx Gamma MX Pant – A softshell pant that can handle mixed weather, is breathable, and provides warmth as well. I used these pants practically everyday because most days ended up being chilly.
- Arc’teryx Beta AR Pant Shell – I ended up only using this once when we knew we’d be going on an extremely muddy trail (French Valley). As a shell layer over the Gamma MX, it provided full protection from the rain, mud, and was easy to wash afterwards.
- Outdoor Research Helium Hiking Gaiters – I questioned whether gaiters were necessary for Patagonia but being there in September with snowmelt and rain, we encountered trails that were completely flooded and mud fields that you had no way around. I ended up slipping on these ultralight and waterproof gaiters several times that helped my feet stay dry even when accidentally dunking them into a a deep pool of water. These also helped keep my pants clean(er) and barely contributed to any weight in my backpack.
Shoes

With the amount of hiking you’ll be doing in Patagonia, of all the clothing you’ll be bringing, your boots are going to be the most critical.
For your hiking boots, here are a few key tips to remember:
- Do not buy new boots – It is absolutely mandatory that these are broken in. Do not, I repeat, do not buy new boots for this trip. Ideally, these are boots you’ve done some hiking with already so you know how they feel and they’ve been able to mold to your feet.
- Mid-high boots recommended – Ankle-high boots are a good idea because they provide way more ankle support (I’m thinking about the tricky boulders climbing up to The Towers) and they prevent ice and snow from coming in.
- Invest in waterproof boots – I’m so glad I had GoreTex boots because I had no fear in splashing my boots in pools of water.
While you’re going to want to bring more shoes, the smarter thing is to keep a simple set up of two shoes – one for hiking and another for relaxing at the hotel or at camp.
What we recommend:
- Waterproof mid-high boots – There’s a distinction between boots and shoes so be aware when shopping around. Invest in a good pair because you’re practically going to be living in these in Patagonia.
- Hiking sandals – These give you some versatility where you can hike in them on hot days, you can jump into the water with them, or you can just use them as slippers.
Gear we suggest:
Socks and Underwear

This will certainly vary from person to person but for a guy, here are my thoughts.
I stand by our original ExOfficio underwear review and have actually doubled down by purchasing even more this year.
Sock wise, you’ll want to bring an assortment of socks depending on the hiking situation so pack according to the weather conditions you’ll be facing. The long ski socks seemed a little much but ended up being quite valuable at night and hiking on extremely cold days (i.e. sunrise up to the Base of The Towers).
As you’re putting together your own Patagonia packing list, the main question you’ll have is how many you should bring. If you’re staying at a hotel like Las Torres, you’ll be able to wash frequently so you can bring less but if you’re doing the hiking the W, O, or staying in camping-style accommodations like at Chile Nativo’s Riverside Camp where hand washing is near impossible, you’ll want to make sure you have enough.
What we recommend:
- 7 pairs of underwear – Why 7? I counted how many days I could go without hand washing and a week’s worth is the number I came up with. This includes the pair needed for the day(s) of flying to get to Patagonia.
- 7 pairs of socks – Moisture-wicking wool socks are you best bet here and if you have issue with blisters, liner socks are helpful.
Gear we suggest:
Looking for Torres del Paine itinerary inspiration?
Our 10 day Patagonia itinerary is filled with details from personal experience that’ll help plan your trip.
Hats and Gloves

Like everything else so far, you’ll need to gauge the weather to see how much you need in this department. Bring as little or as much warmth .
What isn’t made too obvious in any of the guides I read beforehand is how the UV-Index is much higher than you think. Starting from 2013, research showed that the hole/thinning in the ozone layer over Antarctica has stretched over the south of Argentina and Chile. Combine that with the fact that there isn’t much cover on most hikes, you’ll want a good hat.
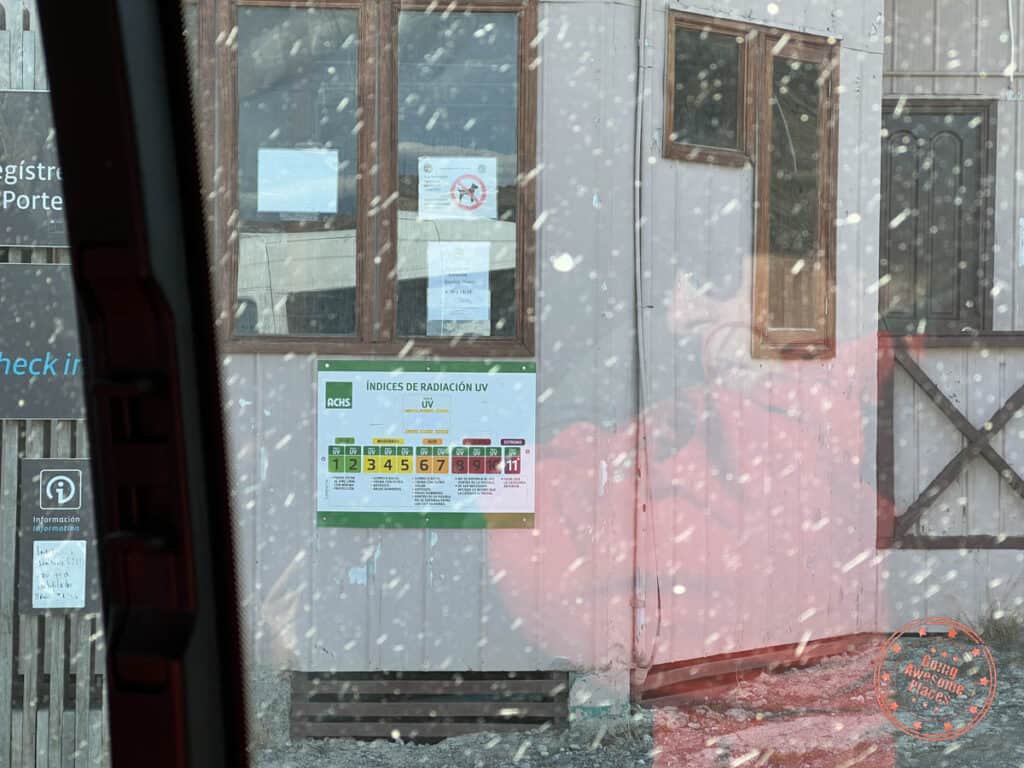
There’s a good reason why there’s a sign for UV at every single entrance to Torres del Paine.
What we recommend:
- Hat – Get some protection from the sun even when it gets hot.
- Beanie/toque – When it’s cold and the wind picks up, it can get cold very fast.
- Buff – As we covered in our Buff headwear review, this is a versatile piece of clothing that every traveler should have.
- Gloves – Unless you’re coming in the winter, you won’t need more than a solid wind blocking softshell glove.
Gear we suggest:
- Arc’teryx Calvus Cap – I ended up replacing this with this Ciele GOCap but effectively the same type of lightweight running hat.
- Arc’teryx Grotto Toque – A thick and ultra-warm beanie/toque that has style.
- Icebreaker Reversible Pocket Hat – A compact beanie that can be used in combination with a full-sized one or you can wear it to bed when camping.
- Buff Headwear – This is the original BUFF that I’ll either wear around the neck, on my head, or around my wrist.
- Outdoor Research Versaliner Sensor Gloves – This is a two-in-one liner and shell glove that was useful when for instance it got incredibly cold at the summit of Cerro Ferrier. I like the liner is there if I really need to block out more wind or I can use that pocket to put in a hand warmer.
PJs

I’m embarrassed to even have this as a separate category but I photographed this separately so here we are.
PJs are one of the easiest things to forget when packing but for me, this is one of those comfort items that I bring for every trip.
Camera Gear

Camera gear is perhaps the most subjective because I’m a full time content creator and all of us have a different style of shooting and want to get different things from photography.
For Patagonia, I knew that I would be shooting photo and video which made the set up a bit more complicated. As some of you know, I’m a dedicated M43 shooter on the OM System (previously called Olympus) platform but hopefully the things I have here can translate to what you shoot with.
I also picked up a shiny new toy in the OM System 150-400mm f/4.5 super telephoto which I really wanted to make use of especially if there was an opportunity to see puma.
Lastly, bring more batteries than you think you’ll need because you might be in a situation where you won’t have power everyday (the case at Riverside Camp). Also bring more memory than you think because you might not be able to download them to your computer every night.
What about drones? So I did pack my DJI Mavic 3 but at the last hour, all of the painstaking work by the Adventure Travel Trade Association to get me a license, fell through. In the end, I only flew it four times from just outside the boundaries of the national park or under permission of the Las Torres Reserve. Honestly, it’s just not worth bringing a drone to Patagonia unless you have specific shots in mind.
What we recommend:
- Dry bag for your phone – If you’re planning on doing any kayaking, this’ll be handy to have to be able to take photos and videos with your smartphone. Operators may have these but it’s not a guarantee.
- Tripod – The sunrises, sunsets, and stars are pretty epic here. If you want to do any photography at low ISO, make sure you have a lightweight one that’ll work with your backpack.
- Range of lenses – Think about the activities you’ll be doing and what you think you’ll get the most bang for buck.
- GoPro and mounts – Whether you want to have a GoPro clipped to your shoulder strap, mounted to a kayak, or on a tripod for a timelapse, think through the things you want to capture. If you’re going kayaking, don’t forget a floaty as someone in our group lost their GoPro in Lago Grey.
- Lens cleaners – It can get wet and dusty in Patagonia so I found that I needed to wipe my lenses everyday to make sure they were clear of dust and water spots.
Gear we suggest:
- Joto Waterproof Phone Pouch – With your phone inside, you can take photos and videos without worry of it getting wet.
- GoPro Magnetic Swivel Clip – Clips to your backpack if you’re looking for POV shots while hiking.
- GoPro Suction Cup Mount – Useful if you want to capture timelapse shots of the boat cruises in Patagonia.
- Peak Design Creator Kit – Useful for group or selfie shots from a tripod using your phone.
- GoPro Shorty Tripod – A small tripod for your GoPro that works in a bind.
- GoPro 3-Way – This was my creative way to use the GoPro on the kayak will intertwined with the bungee cords.
- GoPro Floaty – It’s clunky but will save you from an accident on the water. Trust me, I’ve seen plenty of GoPros drown over the years.
- OM System 2X Teleconverter – I was going to leave this out but these were the only way I could get that close to the puma.
- GoPro Batteries – GoPro batteries still don’t last as long as I’d like but the Enduro batteries (white) are a small improvement over the regular ones (blue).
- OM-1 Batteries – I carry 3 batteries and while I didn’t burn through all of them each day, it provided peace of mind.
- GoPro Hero 10 – Primarily used for kayaking, hiking POV, and sunrise/sunset timelapses. Keep in mind that the Hero 11 is also out now.
- Circular polarizer filter – This really makes the sky pop, cuts the glare in the water, and adds a nice contrast to your landscape shots.
- DJI Mic – Totally a content creator thing but I used this to record clean audio for video.
- OM System Wireless Remote – I use this when the camera is on tripod to eliminate any unwanted shaking. It’s also great for selfie photos with your camera if you don’t have any one else to help you.
- Think Tank SD Card Case – This carries all of the SD and MicroSD cards.
- LensPen – The LensPen is invaluable for cleaning your lens and also viewfinder. The cleaning kit is a great buy.
- Microfibre Cloth – This comes with the LensPen cleaning kit.
- OM System 7-14mm f/2.8 Lens – Amazing super wide-angle lens that’s great for shooting landscape, small interiors, and vlog-style video.
- OM System 40-150mm f/4 Lens – Ridiculously compact for it’s focal length and one of my new favourites when I need reach in a pinch.
- Peak Design Mobile Tripod – Such a handy accessory to pair with my iPhone’s Peak Design Everyday Case. With this, you can do group photos without doing a selfie if you find a ledge, and it’s a great way to watch movies on your phone while on the plane.
- OM System OM-1 Camera Body – I recently upgraded to this camera body for upgrades in video, and new or improved features like hand-held high resolution, built-in ND filters, and bird detection.
- OM System 12-40mm f/2.8 Lens – One of the most-used lenses in my OM System set up.
- OM System 150-400mm f/4.5 Lens – Yes, this was a bit of a beast to carry but knowing that puma tracking was on the itinerary.
- Peak Design Travel Tripod Carbon Fiber – Our favourite tripod that we’ve been using ever since our Peak Design Travel Tripod review.
Travel and Hiking Essentials

I couldn’t really come up with a more clever word for these items but these are essentially gear that were either in my pocket or in the backpack.
The rugged beauty of Patagonia means that more often than not, you’re pretty far from city centers and access to gear if you’ve forgotten anything. That’s why it’s critical to make sure you have everything with you.
Is a water filter necessary? I read a lot of conflicting information here as many guides recommend filters like GRAYL water bottles but between the Riverside Camp with Chile Nativo and Las Torres, I was always able to get filtered water. Locals told us tap water was safe and you’ll also find many waterfalls alongside the hiking trails in the mountain which are very safe and clean to drink.
Can you rent hiking poles? Yes, in theory you can but it didn’t seem convenient at all in Torres del Paine. There are rentals in Puerto Natales but if you’re going straight inside the national park, you’re screwed. You could ask your tour operator to help you with this but we’ve heard that many equipment rental companies went under during the pandemic so it’s might be a crapshoot especially if you do this last minute. If you need them, bring your own and go for an ultralight one.
What we recommend:
- Hiking poles
- Medical kit
- Hydration reservoir
- Sunglasses
- Quick-dry towel
- Snacks
- Headlamp
- Eyedrops
- Lip balm
- Dry bags
- Document holders
- Utility knife
- Masks
- Carabiners
- Hand Warmers
Gear we suggest:
- Peak Design Packable Tote – Similar to the dry bags, this is a handy reuseable bag to help you stay organized. This is useful to have an extra bag in the van/bus when you’re on a tour or if you have an excess amount of things that for some reason don’t fit in your suitcase and you don’t want to have with you in your backpack.
- Hothands Hand Warmers – I didn’t end up using it but for the cold I experienced, there were a number of times I definitely should’ve popped one open.
- Masks – COVID is still out there and so it’s still a good idea to have masks ready especially for indoor places that still require it.
- GU Energy Gel and CLIF Bars – I was fed incredibly well on the trails in Patagonia through the packed lunches by Chile Nativo and Las Torres but I packed these just in case I needed emergency food.
- Money Belt – Safety wasn’t a concern in Patagonia but used this just in case on the flights since I was carrying a good amount of cash.
- Hydrapak Low-Profile Bladder/Reservoir – This is all you need to get if your backpack has the right slot and holes for the hydration tube. The 2L configuration was all that I needed for a full day of activity.
- Black Diamond Distance Carbon Z Poles – I did quite a bit of research on this and really loved these hiking poles because of how small they are when collapsed, how quick they are to set up, and how feather-light they are overall. Were the hiking poles necessary? You could get by without them but they made hiking the steep uphill and downhill much easier.
- Leatherman Free T4 – Thankfully I never had to use this multi-tool other than the scissors but nevertheless something you should think about packing. Just remember to put it back in your check-in when flying.
- Fenix HM65R Headlamp – A powerful and compact headlamp that we’ve reviewed. I loved that I could charge this via USB-C.
- Hydrapak UltraFlask – This perfectly fits in one of the shoulder strap slots of the Shimoda Action X50 and as a standalone water bottle in the tent or hotel room.
- Maui Jim Chee Hoo – Sunglasses with Croakies Arc retainer.
- Tissue Paper
- Carabiners
- Eyedrops – It was dry in Patagonia but my eyes never felt dry so I didn’t have to use these often. Still, something I’d recommend everyone to bring.
- Hand Sanitizer – One is enough and if you run out, you can always refill it as there are stations everywhere now.
- Burt’s Bees Lip Balm – While my eyes didn’t get dry, my lips felt incredibly uncomfortable in Patagonia.
- Shimoda Passport Wallet – A smaller version of the Victorinox Travel Organizer that integrates well with the Shimoda backpack where I stored my wallet, Chile’s PDI slip, additional credit cards, vaccination documents, and International Driver Permit.
- Adventure Medical Kit 0.5 – First aid kit where I’ve also supplemented it with other medication such as Advil Cold & Sinus (ibuprofen), Imodium (diarrhea), Reactine (antihistamine), Gravol (motion sickness), additional bandages, and blister kit.
- Travel Towel – Chile Nativo’s Riverside Camp provided towels but I’d still recommend bringing your own.
- Sea To Summit 1L Dry Bag – Yes, this is a pretty tiny dry bag but I just use it as another organizing bag for random things.
- Sea To Summit Wallet – A great travel wallet that also has a zippered pocket for coins.
- See-Thru Dry Bag – This is an older 15L dry bag where you can throw your camera and other accessories in when you go kayaking.
- Sea To Summit Document Pouch – Used for holding print outs of confirmations, drone license, and other paper things picked up along the way such as maps.
Electronics
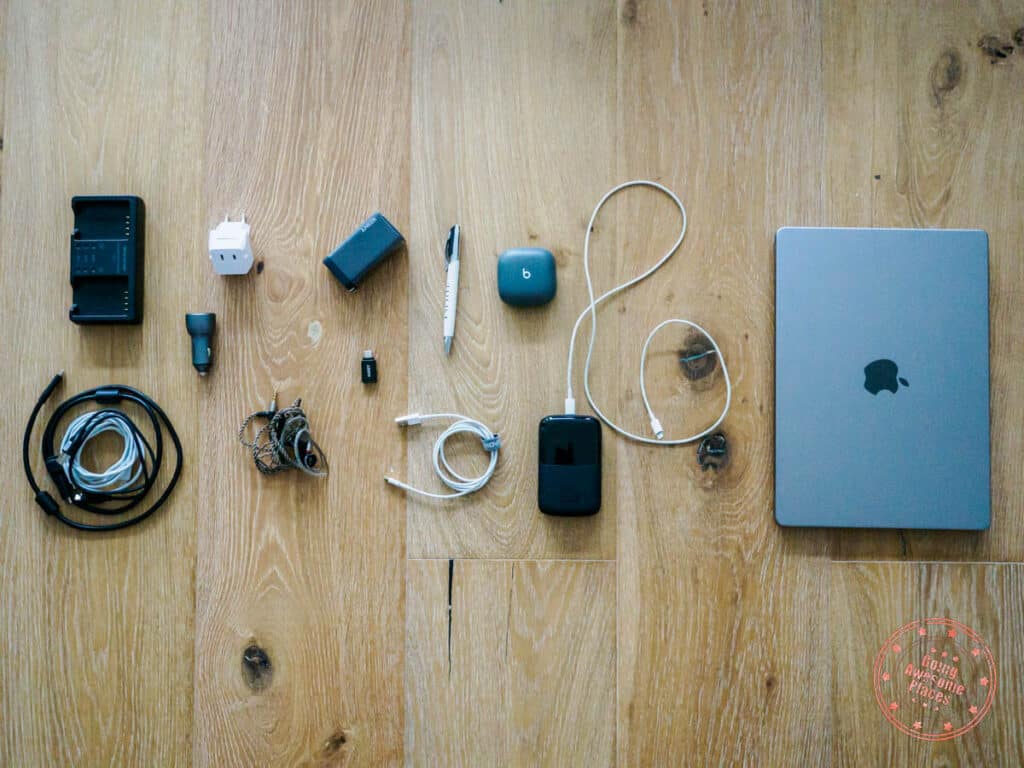
Going through the Peak Design Tech Pouch that carries most of this stuff, I pulled out the most important items for your Patagonia packing list.
What we recommend:
- Battery chargers – If you go through as many batteries as I do, it’s a really good idea to have dual battery charges like the OM System SBCX-1.
- Car adapter USB charger – Newer cars have USB-C and USB in their cars but the older ones don’t. This is a good one to have if you plan on renting a car.
- Plug adapters – Chile officially uses Type L plugs which have 3 round pins but the European Type C works the same but the exception is that they don’t have a circular receptacle.
- Power charger – There are some really good power blocks in the market these days which can charge many devices at once, eliminating the need to use multiple outlets. Invest in a good one.
- USB to USB-C Adapter – Handy to have considering there’s no consistency across the board. I’ve been slowly converting everything to be USB-C on one end.
- All the charging cables – The worst is not having the right cables (USB, USB-C, Micro USB) for your devices. Think about the devices you’re bringing and all the combinations you need.
- Pen – Sounds simple but you’ll need one to fill out custom forms, write post cards, and jot notes.
- Headphones – These days, I bring two sets – one with a plug for the plane and another for wireless use with the laptop and phone.
- Powerbank – Invest in a fast charging and compact 10,000 mAh powerbank.
- Laptop – You might not need one but I’ve found having a laptop handy because it has its own USB outlets which means you can charge more devices. It’s also where you can download your photos and videos to in order to open up space on your memory cards.
Gear we suggest:
- OM System Dual Charger – Bulky but I can’t stress enough how valuable dual charging is.
- Tons of Charging Cables
- Dual Type C Plug Adapter – With this charging set up, you should really only need 1 of these.
- Dual USB-C Car Adapter – You’ll need this if you plan on renting a car.
- Anker 737 Charger – A compact and powerful charger that can charge 3 devices at the same time (2 USB-C and 1 USB)
- USB C Adapter – With more USB-C ports between the MacBook Pro and the Anker charger.
- UE 900 Headphones – Quality headphones with a stereo plug for use on the plane.
- Pen
- USB to Lightning Cable – Almost all planes use USB for charging so you’ll still need one of these
- Beats Fit Pro – My favourite wireless headphones that actually fit my ears vs. Airpods.
- INIU 10000mAh Powerbank – Seriously one of the best powerbanks I’ve owned. It recharges quickly, the phone charges at remarkable speeds with its 22.5W output, it can charge the OM-1 camera, and it’s small.
- USB-C to Lightning Cable – You get faster charging with USB-C and it pairs well with the MacBook Pro.
- 14″ MacBook Pro M1 Max – A ton of processing power with this one that is my workhorse for photo and video editing.
Backpack and Sling
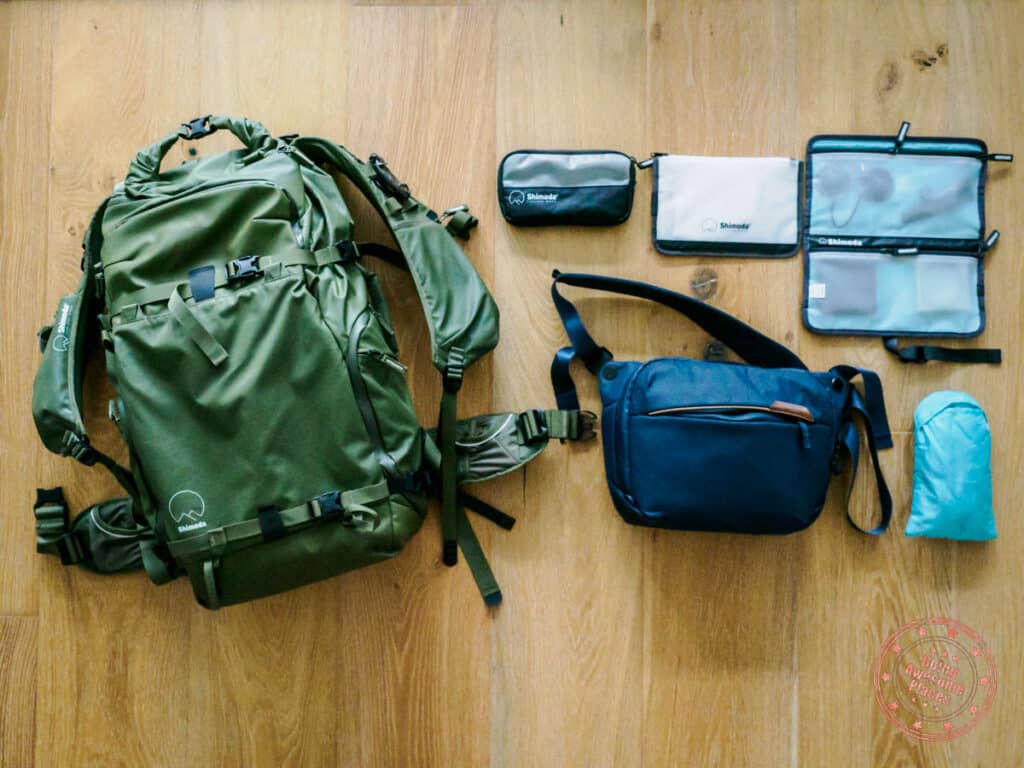
This is a game-changing set up for anyone that’s is going to be doing any sort of hiking and photography.
From previous experience hiking in Utah and a recent trip to Mount Rainier in Washington, I knew that having the right backpack set up was critical. Unfortunately, the original f-Stop Loka was showing its age and couldn’t fit my new wildlife telephoto lens so I had to find a replacement. I eventually landed on Shimoda, whose designer actually came from f-Stop.
The backpack I picked up was the Shimoda Action X50 with the Large Mirrorless core unit.
How did the backpack do in Patagonia? The backpack seriously dominated in Patagonia and handled every single scenario it faced. Whether it was the immense amount gear when flying, the heavy load when hiking, crazy weather in Patagonia, this backpack did not let down. I was more organized than ever before on this trip and never once did my shoulders bark at me.

What makes the Action X50 amazing? Thoughtful design is at the core of the backpack with shoulder strap pockets being at the top, the accessory pouch that slides into the waist strap for more quick access functionality, extreme comfort despite the heavy carrying weight, pocket/storage design, quick deploy side pockets, charging cable passthrough to one of the side pockets, rugged exterior, quick-access zips, and more.
The best adventure backpack in the market
If you’re a photographer or videographer and looking for a bag that can handle serious trekking and your camera gear, while offering a plethora of pockets with multiple ways off access, you really need to check out Shimoda.
WE GOT YOU COVERED: Use code WELCOME10 to save 10% off your order.
Can the Action X50 be used for the treks? Yes, absolutely. There’s a huge expandable roll-top space that can hold even more of your gear. There’s also the larger Action X70 that you can consider if you need that hybrid backpack that can handle adventure and photography well. These bags also have many loops available to strap items on the outside.
You’ll notice that I also packed a sling. This might seem a little extra but again from experience, if you have the space, it’s extremely handy for multiple situations – 1) When flying, it can act as a “personal item” so you can keep important items with you and allow you to put the backpack in the bin above and 2) For shorter outings where you don’t need all of the gear on you such as exploring the town of Puerto Natales, it gives your back a break.
Is the backpack too large as a carry on? When fully packed, the Action X50 bag looks enormous but thanks to its roll top design, you can bring the height down. LATAM asked me to put it in the dimension checker device they have and they were surprised that it fit. With the exception of one flight, I was allowed to bring it on all flights and could fit in the overhead with no issue.
What we recommend:
- Versatile hiking and travel backpack – Find out if your current backpack can hold all of the gear you have both in flight and hiking configurations. If it can’t work, it might be time for a new travel backpack.
- Sling bag – A collapsible lightweight camera bag when a full backpack is overkill.
- Organization pouches – Layer in additional organization with various pouches.
Gear we suggest:
- Shimoda Action X50 – When it comes to serious hiking and photography, I’m convinced this is the best backpack on the market. I’m seriously impressed. For long hikes, definitely upgrade to the Plus Shoulder Straps as well. They also have special straps for women that are better contoured shapes and positioning of the sternum straps.
- Peak Design 6L Sling – A second bag that made it easier to fly and on days when I didn’t want a full pack.
- Shimoda Accessory Pouch – Slides into the waist strap for easy access and used to store snacks and batteries.
- Shimoda Travel Pouch – An accessory organizer in the backpack that I used to carry masks and emergency medicine.
- Shimoda Panel Wrap – Another organizer used to separate items like hex keys, cables, and filters.
- Shimoda Rain Cover – This was stuffed at the bottom of the backpack and never needed it because the backpack itself is quite protected from rain.
Money

Depending on how your Patagonia itinerary is laid out, you might be literally going from Santiago to Puerto Natales and then to Torres del Paine National Park all in one go. This means you won’t have an opportunity to withdraw Chilean Pesos.
We highly recommend that you have your money needs prepared ahead of time so you’re not caught in an awkward situation because once you’re out there in the mountains, there aren’t exactly ATMs out there.
If you’re going to Argentina, you most likely won’t be able to get that currency in your home country. They also have a very strange situation with two different rates – one is the official rate and another called the ‘blue’ market rate. It’s effectively a black market exchange but it’s widely accepted. When you exchange money at money changer or most businesses, you’ll be going doing it at the ‘blue’ market rate.
Can you use credit card? In Patagonia, you’ll be impressed by how widely accepted credit cards are. You’ll have no problem using it in cities like Puerto Natales and Punta Arenas in Chile but in Argentina, cash will go much farther as credit cards can come with unfavorable rates.
Are there ATMs? Yes, there are ATMs in the cities. You can also try to withdraw from an ATM at the airport when you first arrive in Chile or Argentina. Be aware though that ATMs do have a withdrawal fee for international cards. Your bank may also apply a fee. ATMs also have maximum withdrawal amounts. In Chile, many are set to 200,000 CLP. Lastly, heads up that smaller towns like El Chalten in Argentina are notorious for running out of cash.
How valuable is USD? In Argentina, it’s very valuable as locals want US currency and is what the ‘blue’ market is built against. In Chile, USD is very much a back up currency that’s useful for tipping but most establishments expect Chilean Pesos.
Before you go, print out a Currency Conversion Cheat Sheet!
What we recommend:
- Exchange for Chilean Pesos (CLP) in your home country – $300-400 USD worth is a good starting point.
- Exchange for US Dollars (USD) in your home country – Calculate which hotels are charging in USD, breakdown of tips, and what you’ll need to exchange for more CLP or ARS later in your trip. Bring even more if you’re going to Argentina.
Special Discount with Chile Nativo

Chile Nativo was the main operator I used for my trip to Torres del Paine and they are the leaders in helping organize independent W and O treks but also do incredible guided experiences in the park.
We got you! We’ve negotiated a special 5% promotion with Chile Nativo. This applies to existing packages that they offer but not add-ons & upgrades or fully customized tours.
How? Type in “Going Awesome Places” under “Referral discount”. Simple as that!
Suitcase

You’ll need a good suitcase to carry all of the clothes and gear you’ll be bringing with you to Patagonia.
How you’re set up for your suitcase will largely depend on whether you’re doing the multi-day treks. If you’re doing mainly day trips, a suitcase will work perfectly. For the W trek or O trek, your excess gear is better off in a large duffle or trying to fit everything into a giant pack.
What we recommend:
- Suitcase, hiking backpack, or duffle – The type of Patagonia trip will dictate your set up here.
- Tons of clothing organizers – This’ll make it easier to find things. Remember to roll your clothes to maximize your space.
- Luggage Lock – TSA-approved lock for your suitcase.
Gear we suggest:
- Db Journey Strom 60L – A bit of an unorthodox design but it sneakily offers a lot more storage space than you think it has.
- Various clothing organizers – I’ve tinkered with many over the years but I’ve found a combination of the Peak Design Travel Cube, Eagle Creek Specter Set, and mesh sacks.
- Luggage Lock – The standard lock that’s handy as an additional layer of security in situations where you’re leaving your suitcase behind at camp or in your hotel room.
Toiletries

Last but not least are your toiletries. There’s no need to go through everyone’s personal care items but there are a few things I want to draw your attention to.
As we mentioned earlier, the air is drier in Patagonia and can hit people in different ways depending on where you’re coming from. Don’t underestimate the importance of good moisturizers for your skin because that type of discomfort will follow you throughout the trip and only get worse if not taken care of.
Remember that earlier we’ve also recommended bringing eye drops and lip balm but we put them in the backpack to make sure you always have it on you.
Lastly, it’s worth re-iterating that the UV-Index is higher than you expect when comparing with other places at the same elevation and considering it isn’t near the equator. On average, the UV-Index is a 7 which is already in the high zone. Always use sunscreen in Patagonia.
What about bug repellent? I originally packed Ben’s bug repellent but never had to use it at all in the fall because they were non-existent. n the summer, you might notice a few mosquitoes but because of the wind, dryness, and lower temperatures, it’s not much of a problem at all. That said, mosquitoes can explode in the summer if there’s rainy weather hits. If you’re sensitive, pack a mosquito net and repellent in case.
Do you need Diamox? Altitude is not a factor in Patagonia as it is mostly all close to sea level. That’s why you don’t need to get Diamox or any other altitude-sickness remedies ahead of time.
What we recommend:
- Toiletry bag – This should be a compact pouch that can store all of your essentials inside.
- Vitamins – Boost your immune system throughout the trip.
- Sunscreen – Either use a combination of face and body sunscreen or stick to one. Use a minimum of 50 SPF.
- Lotion and face cream – Most of Patagonia doesn’t have a lot of tree cover so make it a habit to put sunscreen on everyday and to re-apply as well.
Gear we suggest:
Apps
Something that might not immediately come to mind when you’re packing for Patagonia are apps that you should download before you go.
What we recommend:
- Hiking tracking app – If you’re looking for a free app, Wikiloc is a great one. If you want something with more premium features, we recommend you check out AllTrails and Gaia GPS (get a 1 year trial)
- Translator app – Yes, Apple has its own built-in translation app now but the best in the market is still Google Translate. Make sure to downloda the Spanish language pack so you can use the app offline.
- Map app – Google Maps is the first one we’d recommend because it’s quite easy to use maps offline but if you’re not a fan, another great alternative is Maps.me which is a great offline map app
- Wind tracking app – This sounds silly but while in Patagonia, we saw guides use the Windy app to get an idea of how strong the wind is going to be in Torres del Paine. Another app, WindGuru (web only) was also used.
- Bird app – If you’re a fan of birds and ID a bird based on photo or sound, the Merlin Bird ID app is insanely useful. eBird is another you’ll want to have on your phone for tracking.
9 Patagonia Packing Tips

Despite trying to be as prepared as possible for my trip to Patagonia, I still ended up making mistakes and learning things that I wish were made more obvious to me in other packing lists.
Not all of these are gear related but things that you’ll want to have prepared before you leave your house.
- Wear your thickest and heaviest layers – If you’re having trouble cramming everything into your backpack and suitcase, wear your thick jacket and pants, and bulky hiking shoes on your flight despite how uncomfortable it might be.
- Clear your computer’s memory before you go – This seems like a rookie mistake but with the amount of photos and videos I was taking, I quickly ran out of room even on my laptop so I had no choice but to delete things to make it work.
- Bring multiple credit and debit cards – In case one doesn’t work, have backups available. We later learned in Atacama that some machines charged an extra fee for MasterCard while this never happened for the American Express.
- Account for tips ahead of time – Since USD is much easier to acquire before you go on your trip, it’s worth pre-calculating how much in tips you’ll need for your drivers, guides, and housekeeping. Have a separate envelope ready so you don’t get too surprised when you’re traveling.
- Have a good power charging solution – If your Patagonia trip involves locations that have limited electricity, make sure you have the right combination of power blocks, cables, and powerbanks so you’re not scrambling on the road.
- Go lightweight – We cannot express enough how important it is to pack as minimal as possible and to invest in gear that is lightweight. This might cost more money but will be worth it in the long run especially if you’re going to carrying that weight on your back.
- Be prepared to re-wear your clothes – If you’re camping, the opportunities to hand wash your clothes will be limited because you’ll be either on the move or it just doesn’t get warm enough to dry. As a result, you’ll be re-wearing your clothes throughout the trip especially if you want to pack minimal. It’s totally okay and even more okay if you wear merino wool because they don’t smell even after multiple uses.
- Don’t forget your insurance – Make sure to find out how to pick the right travel insurance and get the right coverage for all of the adventuring you’ll be doing in Patagonia. Check out our review of World Nomads to find out why they’d be a good fit for this trip.
- Flying with water – While for your international flight, you won’t be able to bring water with you on your carry on, you can for all domestic flight in Chile. This means you don’t have to fuss too much about having a bottle filled with water in your backpack while flying.
- Check restrictions on your flight – When packing, think ahead about how you need to be organized between your international and domestic flight and if you need to shift things around. Luckily, domestic LATAM and Sky Airline check-in weight limits are similar to international lim
Frequently Asked Questions
Drones are not allowed in the national parks such as Torres del Paine or Los Glaciares. In Chile and Argentina, drones need to be registered with the national registry (DGAC and ANAC respectively), however it is very difficult to do this as a foreigner. Outside of national parks, you could try to fly it but at your own risk.
The ever-changing weather conditions throughout the year means you need to always be prepared so make sure you have a range of layers such as a waterproof jacket, synthetic down layer, technical fleece, and thermals.
For the best adventure travel backpack that is designed with photographers in mind, we recommend the Shimoda Action X50.
This depends on how long your trip is but as a general rule of thumb, we recommend $400 USD worth in CLP if you’ll be in Chile and $400-$500 in USD. Bring even more if you are going to Argentina.
Chile and Argentina both use the “Euro” plug Type C which have two circular pins. Chile officially uses Type L which has 3 round pins but Type C is compatible. Argentina also uses the Type I which is the same one used in Australia, New Zealand, China, and some parts of the South Pacific. The standard voltage for both is 220V and the standard frequency is 50Hz.
Water is safe to drink throughout Patagonia. In the mountains, glacier water that you’ll find flowing in waterfalls are pristine and also safe to drink.
Patagonia is colder than you think. In the summer, temperatures can dip as low as 6°C / 42.8°F. In spring and fall, it’s quite possible the temperature can drop to or below 0°C / 32°F.
Patagonia is mostly all close to sea level. For instance, the highest point on the Base of The Towers hike is 900m (2953 feet) so you won’t feel a thing.
The single most important item is a quality waterproof outer shell because you never know when there might be rain and it can also get incredibly windy as well.
Are you planning a trip to Chile and/or Argentina and have more specific questions about building your own Patagonia packing list? Don’t hesitate to reach out to us.
What you should read next